Event Branding
- Add text, images, and other media to the registration page
- Button and tab color | Open layouts
- Buttons, tabs, and title bar color | Bar layouts
- Customize the event title and date | Bar layouts
- Customize the event title and date | Open layouts
- Event player container and window backgrounds
- Registration page background and form and content area colors
- Set up the banner and logos
- Use the text editor to customize events and emails
Add text, images, and other media to the registration page
All registration layouts include a dedicated space for additional content. By default, this space - called the landing text - is empty. You can edit it and include additional event information, images, speaker headshots, links, and videos on your registration page. You can also add your own custom code or use auto-fields to include the event title, date, duration, or reminder buttons on the page.
The landing text area is in the registration container, either next to the registration form (open layouts and 2-column bar layout) or spanning the width of the registration container (one-column and popup registration bar layouts).
To add content to the registration page:
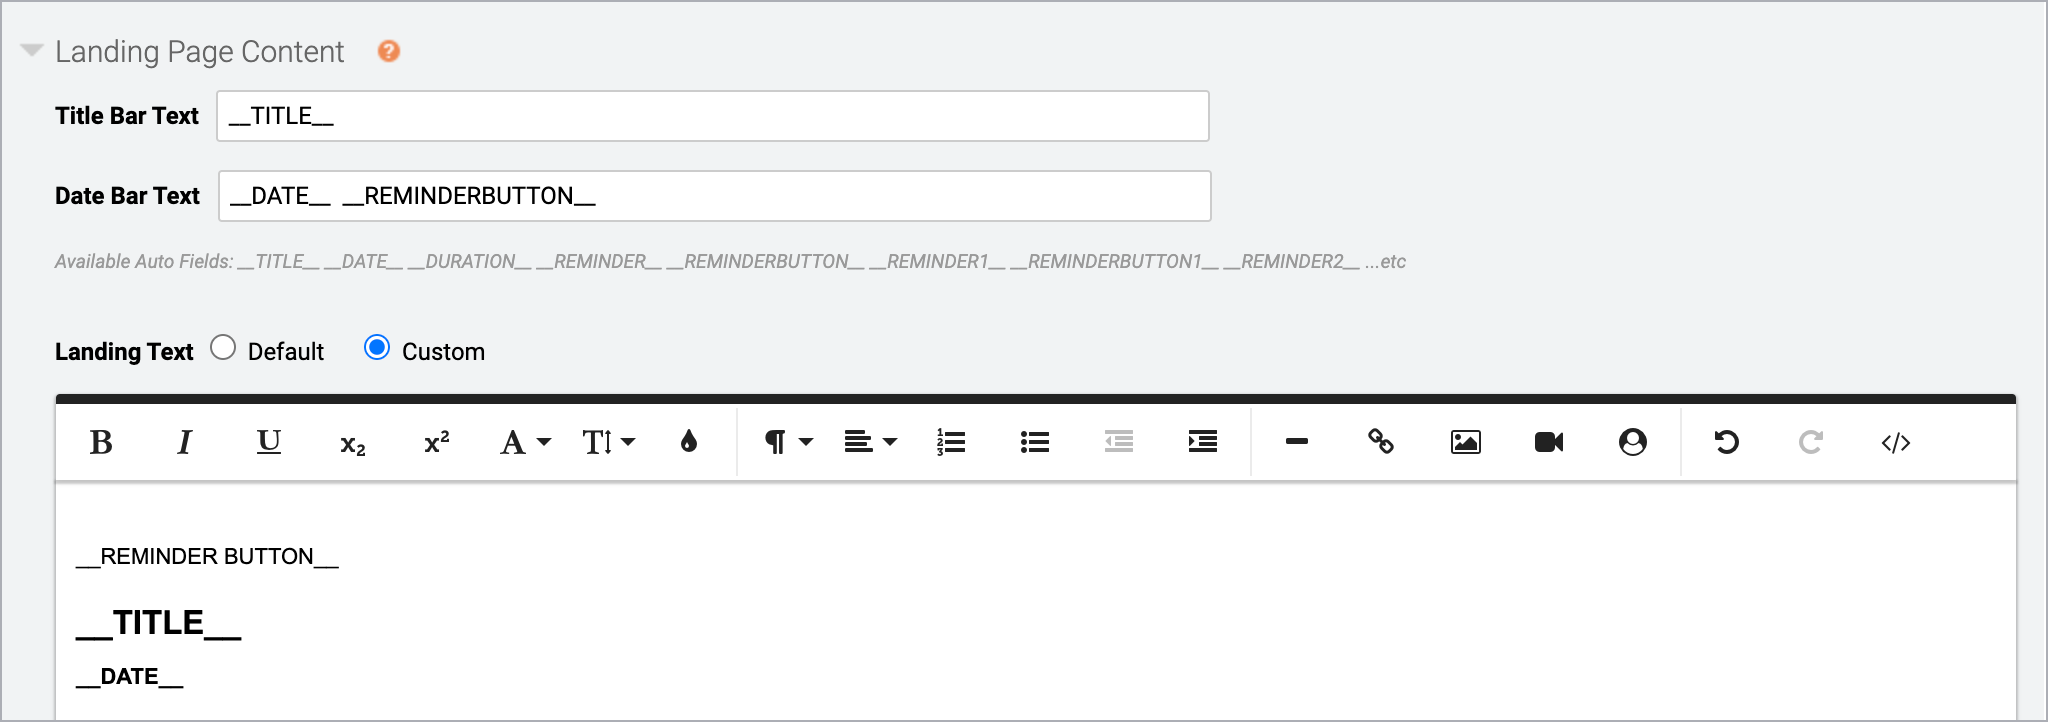
Go the Registration tab, scroll to the Customize Event Landing Page section, and open Landing Page Content. Next to Landing Text, select Custom to open the text editor.

When you first open the text editor, it includes auto-field placeholders for the event title, date, and the Add to Calendar button. If you want to include this information in the body of the page, clear the Title Bar Text and Date Bar Text fields so that it isn't duplicated.
Otherwise, at the right side of the editor, click </> to switch to code view and delete the placeholder code. Click </> again to switch back to the text editor view and add and format text, images, speaker headshots, links, and videos. Available auto-fields are displayed below the editor.
To learn more about auto-fields, see Auto-fields for event landing pages.
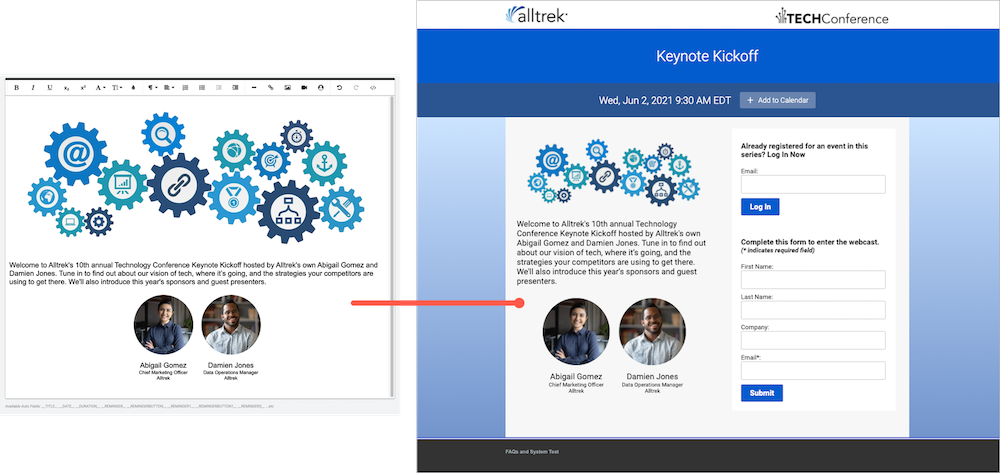
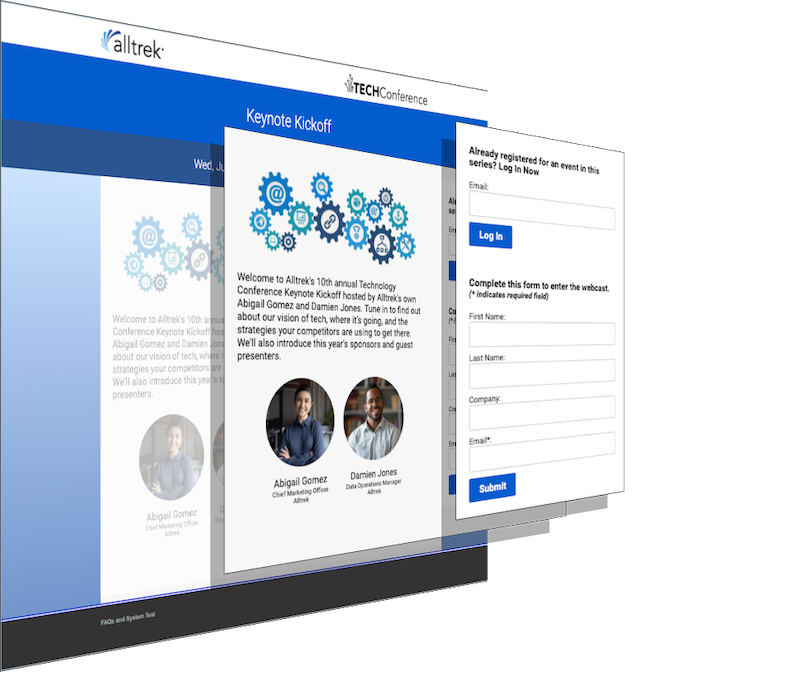
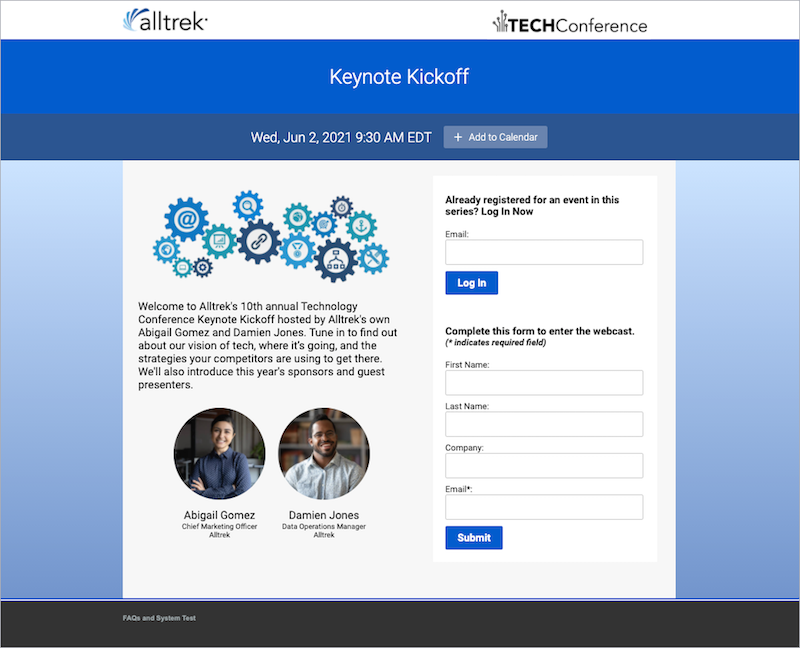
This example shows a registration page with an image, speaker headshots, and text.
Button and tab color | Open layouts
The highlight color sets the color of the buttons on the registration page and the primary and sidebar tabs in the event window.
Note: The text color is automatically set to white or black, to contrast with the highlight color. If you select a dark color, the text is white. If you select a light color, the text is black.
To change the highlight color:
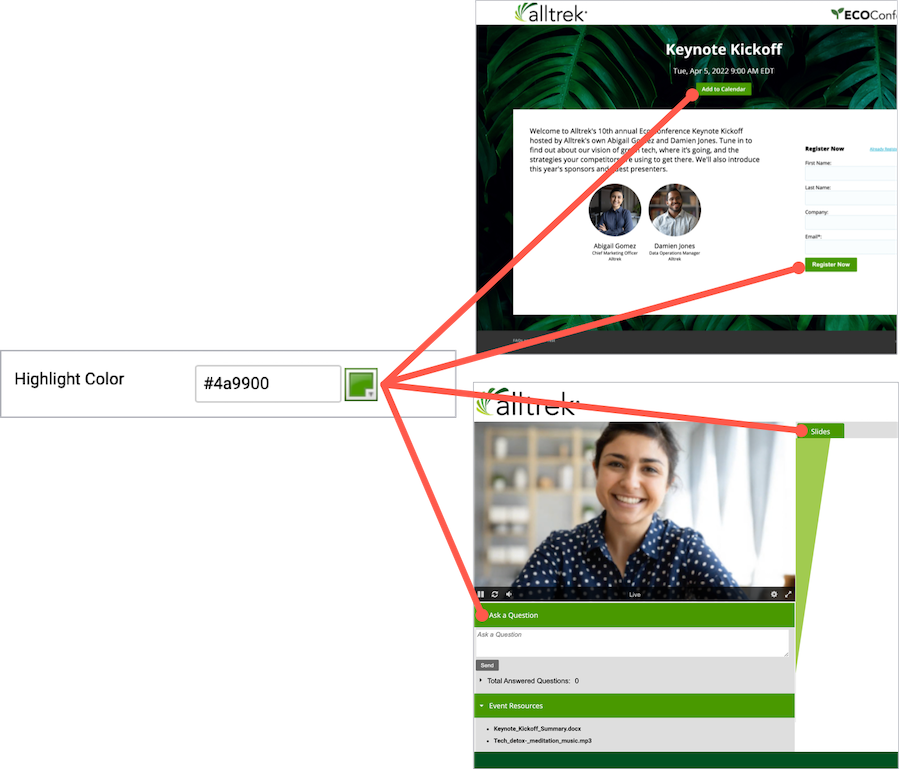
Go to the Player & Branding tab. Open Advanced Branding and set the Highlight Color.
This example shows green buttons on the registration page and green tabs on the event window.
Buttons, tabs, and title bar color | Bar layouts
The highlight color sets the color of the title bar, buttons, and the ruling line above the footer on the registration page. The highlight color is also used for the primary and sidebar tabs in the event window.
Note: The text color is automatically set to white or black, to contrast with the highlight color. If you select a dark color, the text is white. If you select a light color, the text is black.
To set the color for buttons, tabs, and the title bar:
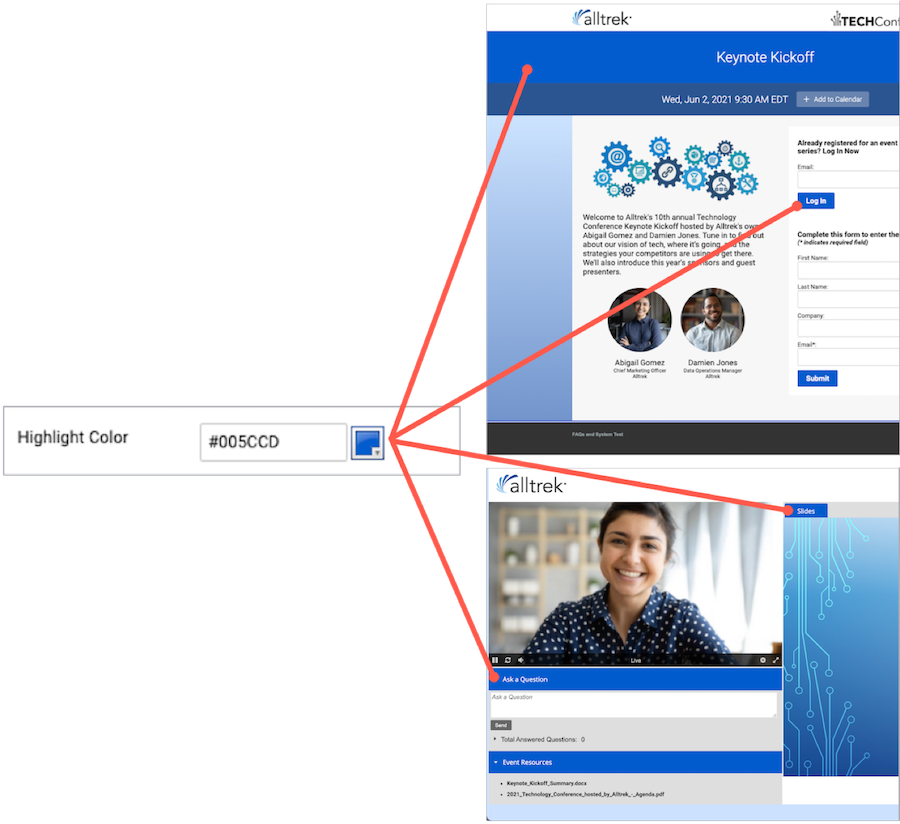
Go to the Player & Branding tab. Open Advanced Branding and set the Highlight Color.
This example shows a blue title bar and buttons on the registration page and blue tabs on the event window.
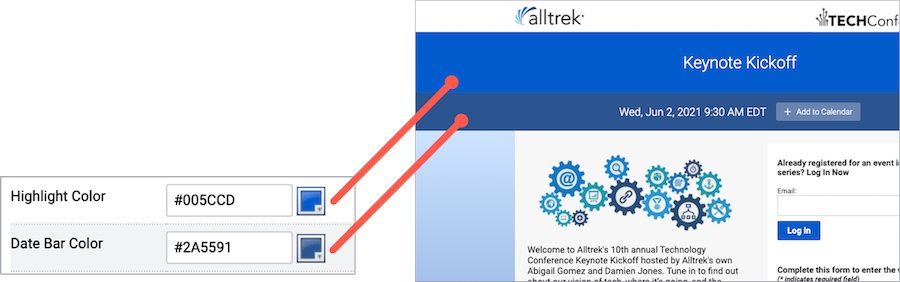
Customize the event title and date | Bar layouts
By default, the registration page includes the event title in the title bar and the event date and time and a calendar reminder button in the date bar. You can change the bar colors and update the text displayed. You can also hide the title bar, date bar, or both.
Jump to: Set the bar colors | Change the bar text
Set the bar colors
Customize the colors of the title and date bars to match your brand.
To set the bar colors:
Go to the Player & Branding tab. Open Advanced Branding and for the:
- Title Bar, set the Highlight Color
- Date Bar, set the Date Bar Color
The Highlight Color also sets the color of the buttons on the registration page and the buttons and tabs on the event window. To learn more, see Buttons, tabs, and title bar color | Bar layouts.
Note: The text color is automatically set to white or black, to contrast with the bar color. If you select a dark color, the text is white. If you select a light color, the text is black.
This example shows the title bar and date bar colors on the registration page.
Change the bar text
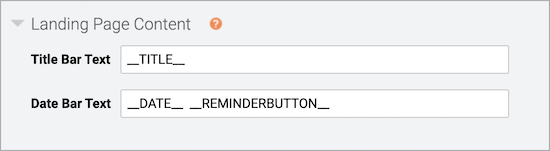
The registration page automatically displays the event title in the title bar and the date and time, and calendar reminder button in the date bar. This information is included by the __TITLE__, __DATE__, and __REMINDERBUTTON__ auto-fields. The benefit of auto-fields is that they automatically update when you make any changes to your event title or date on the Event Settings tab.

You can:
- Edit the text and provide additional event details or manually change the date and time
- Rearrange the auto-fields or include other auto-fields
- Hide the title bar or date bar by removing the text
For example:
- If you'd like to allow attendees to register for a Simulated Live event before scheduling a broadcast, you can update the event date and time to reflect the planned broadcast date.
- The original broadcast date and time are displayed on Live event replays. After the Live event, you can remove the date bar to avoid confusing attendees.
To change the text:
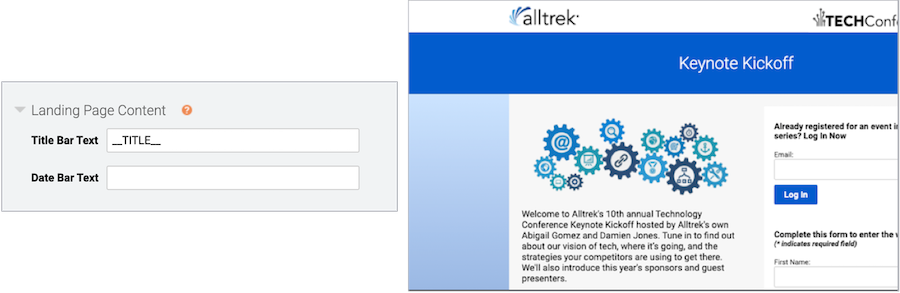
Go to the Registration tab. Scroll to the Customize Landing Page Content section and open Landing Page Content.
This example shows the registration page without a date bar. (Date Bar Text is empty.)
Customize the event title and date | Open layouts
By default, the registration page includes the event title, the event date and time, and a calendar reminder button. For Title Top layouts, these elements are centered on the page, above the registration form and the landing page content. For Side-by-Side layouts, they are included in the landing page content area next to the registration form. You can update the text displayed or hide the title, date, or both.
This information is included by the __TITLE__, __DATE__, and __REMINDERBUTTON__ auto-fields. The benefit of auto-fields is that they automatically update when you make any changes to your event title or date on the Event Settings tab.
Note: The color of the title and date text depends on the background color you select. If you select a dark color, the text is white. If you select a light color, the text is black. To learn more about backgrounds, see Registration page background and form and content area colors.
To change the text:
Go to the Registration tab. Scroll to the Customize Landing Page Content section and open Landing Page Content.
You can:
- Edit the text and provide additional event details or manually change the date and time
- Rearrange the auto-fields or include other auto-fields
- Hide the title or date by removing the text
For example:
- If you'd like to allow attendees to register for a Simulated Live event before scheduling a broadcast, you can update the event date and time to reflect the planned broadcast date.
- The original broadcast date and time are displayed on Live event replays. After the Live event, you can remove the date bar to avoid confusing attendees.
This example shows the registration page without a date.

Event player container and window backgrounds
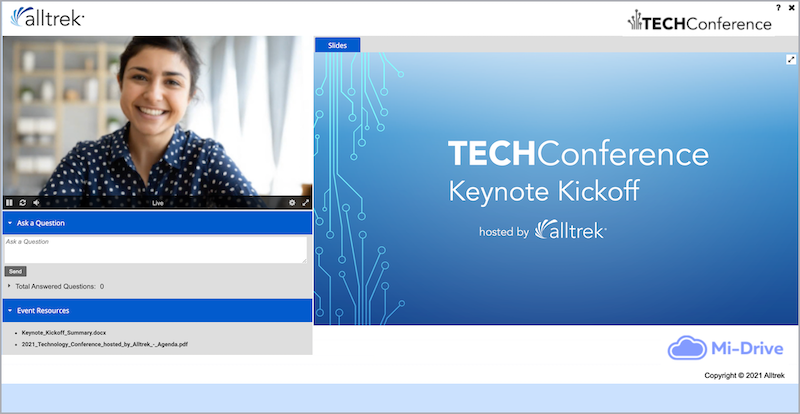
The event window is made up of two layers: the player page background and the player container. The player page background is simply a background color or image. The player container holds the video player, event content tabs, and the footer.
Jump to: Set the player container color | Set the event window background
This example shows the event window background behind a white player container.

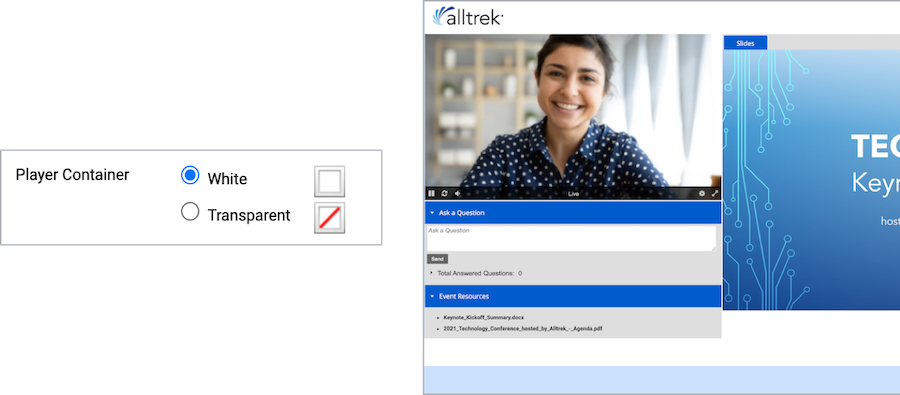
Set the player container color
You can set the player container to white or transparent:
- Use white to visually group elements
- Use transparent to showcase the background color or image
To set the player container color:
Go to the Player & Branding tab. Open Advanced Branding and set the Player Container Color.
This example shows a white player container on the event window.
Set the event window background
The event window background displays behind the player container. By default, the player page background displays the same background color or image as the landing page. You can select a background color, upload a background image, or both. (Set the banner to transparent to have the player background show through.)
Background images are centered and repeat horizontally. We recommend uploading a horizontally repeating image, or gradient, or an image at least 1900 x 1200 pixels.
Choose a background image that is roughly as tall as the player container will be. The player container gets taller to accommodate footer content, but background images don’t scale vertically to fill the space. The background color is displayed where the background image ends.
To set the event window background:
Go to the Player & Branding tab. Open Advanced Branding, clear the Use Reg Background Color and Use Reg Background Image checkboxes, and then set the Reg Page Background color.
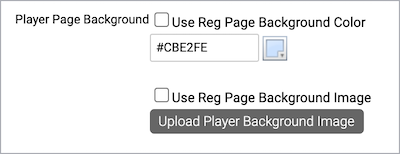
To upload a background image, click Upload Player Background Image.
This example shows a gradient background image that can be repeated across the registration page and an image that can be stretched.
|
Background Gradient |
Background Image | |
|

This example shows the player page background color in the event window.
Registration page background and form and content area colors
The body of the registration page is contained in three layers: under everything is the page background color or image. Next is the registration container which holds the landing page content and registration form. Finally, with a two-column layout, the form container holds the registration form.
You can set a color for each layer and upload a background image; you can also set the registration container to transparent to allow the page background to show through.
Jump to: Set the registration form color | Set the content area background color | Set the registration page background
This example shows the layers in a two-column bar layout.
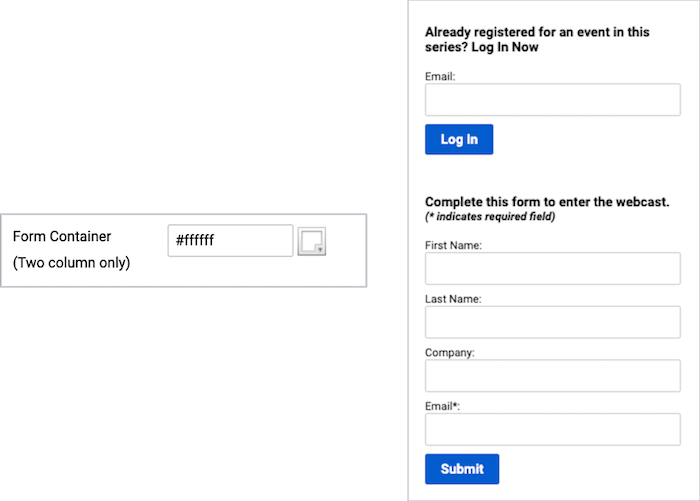
Set the registration form color
In a two-column layout, you can set the background color of the registration form. Remember that the highlight color sets the color of buttons; select a color that contrasts well.
To set the registration form color:
Go to the Player & Branding tab. Open Advanced Branding and set the Form Container Color.
This example shows a white form container on the registration page.
Set the content area background color
The registration container color is the background color for the landing page content and the registration form.
You can:
- Set a color to make it stand out from the page background
- Set it to transparent to showcase the background color or image
- For the two-column layout, set it to the same color as the form container for a unified look
Note: When using a transparent registration container on a dark page background, you might need to adjust the text color for the landing page content to make it visible.
To set the content area color:
Go to the Player & Branding tab. Open Advanced Branding and set the Registration Container Color.
This example shows a light gray registration container with a white registration form (form container).
Set the registration page background
The registration page background displays behind the registration container. You can select a background color, upload a background image, or both. (Set the banner to transparent to have the page background color show through.)
Background images are centered and repeat horizontally. We recommend uploading a horizontally repeating image, or gradient, or an image at least 1900 x 1200 pixels.
Choose a background image that is roughly as tall as the registration container will be. The registration container gets taller to accommodate long registration forms and landing page content, but background images don’t scale vertically to fill the space. The background color is displayed where the background image ends.
To set the registration page background:
Go to the Player & Branding tab. Open Advanced Branding and set the Reg Page Background.
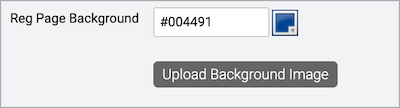
To upload a background image, click Upload Background Image.
This example shows a gradient background image that can be repeated across the registration page and an image that can be stretched.
|
Background Gradient |
Background Image | |
|
This example shows a gradient image as the background on the registration page.
Set up the banner and logos
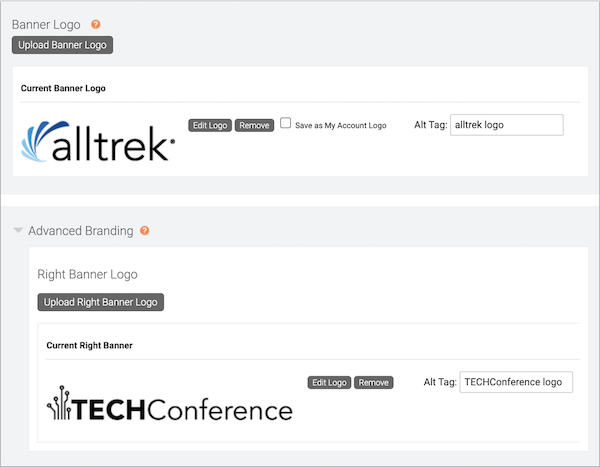
Add banner logos
You can include your organization’s logos or images related to the event in the banner. These images are anchored to the left and right sides of the registration page and event window. You can display a left logo, a right logo, or both. To hide the banner, don’t upload either logo.
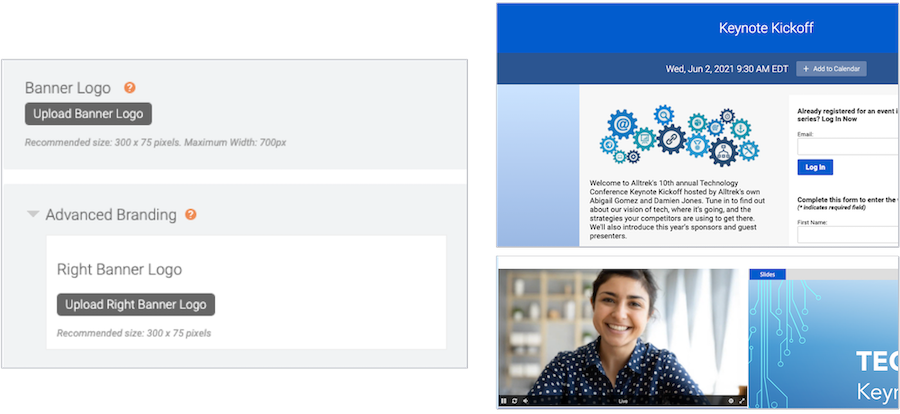
The recommended size for logos is 300 x 75 pixels, with a transparent background. The maximum recommended width for both logos combined is 900 pixels for bar layouts and 1200 pixels for open layouts.
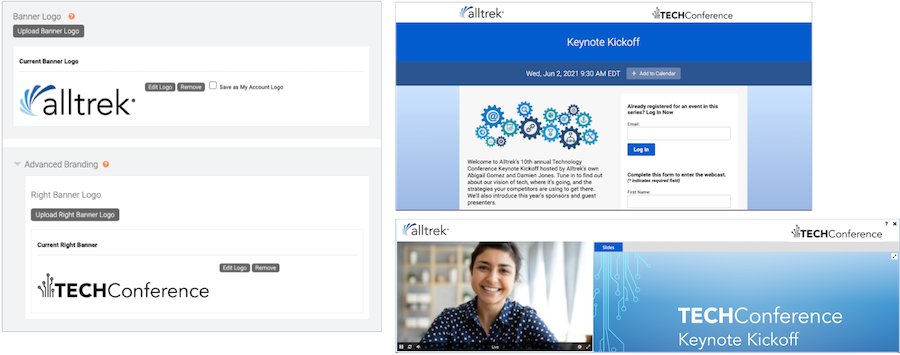
Go to the Player & Branding tab and scroll to the Branding Options section. To add a:
- Left logo, under the Banner Logo section, click Upload Banner Logo
- Right logo, open Advanced Branding, and under Right Banner Logo, click Upload Right Banner Logo
This example shows both logos on the registration page and the event window.
This example shows an event with the banner hidden. (Logos are not uploaded.)
Add alt text
Include alt text for your banner logos to make your event more accessible. Alt text is the text that accompanies the logos and is read aloud by screen readers. It provides context and describes the images for visually impaired attendees.
To add alt text to logos:
After you upload your logos, next to Alt Tag, enter your alt text.
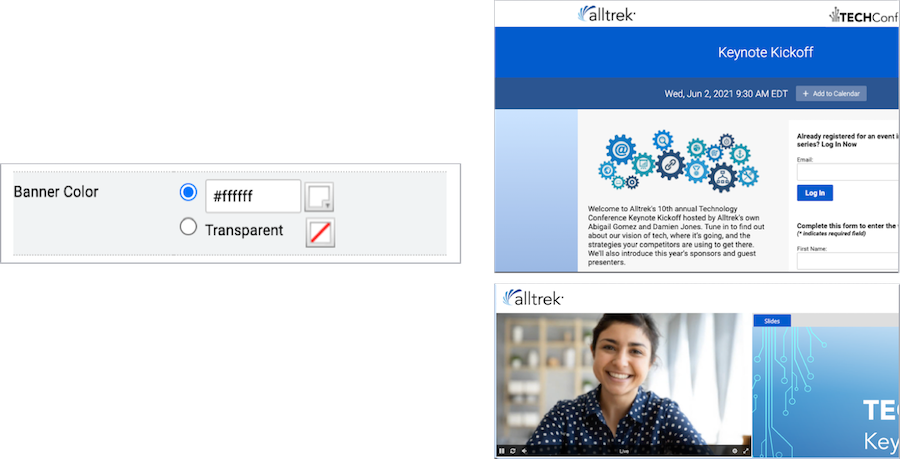
Set the banner color
- Registration page background color on the registration page banner
- Player page background color or image on the event window banner
Note: Background images do not display in the banner on the registration page.
Go to the Player & Branding tab. Open Advanced Branding and set the Banner Color.
This example shows a white banner on the registration page and the event window.
Use the text editor to customize events and emails
Jump to: Add images | Add speaker headshots | Add links | Embed videos | Add a Twitter feed
When you select the Custom option for the landing page content, custom players tabs, and event emails, it opens the text editor.
The following table shows the elements you can customize and the content you can add.
| Element | Go to this tab and select... | Things you can add |
|---|---|---|
| Landing Page Content | Registration tab. Landing Page Content > Landing Text > Custom | Text, images, links, videos, speaker details |
| Player Footer | Event Content tab. Player Footer > Manage Player Footer | Text, images, links, videos, speaker details, Twitter feed |
| Custom Player Tabs | Event Content tab. Add Custom Player Tabs | Text, images, links, videos, speaker details, Twitter feed |
| Registration Confirmation, Event Reminder, and Follow-up Emails | Email & Marketing tab:
|
Text, images, links |
Add images
To add images:
- On the toolbar, click the Insert Image button.

- Click Choose File, select the image, and then click Upload.
- Optional. Resize, rotate, crop, or add text to the image before adding it. You can also add padding to the image by resizing the canvas and set the background color for the canvas.
- When finished editing, click Insert.
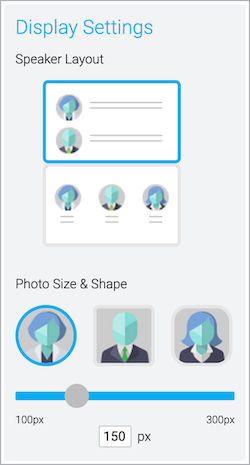
Add speaker headshots
Tell your audience about your presenters and add speaker details, including their photo, name, title, and company. Headshots must be at least 300x300 pixels and preferably the same height and width.
To add headshots:
- On the toolbar, click the Speaker Details button.

- Under Display Settings, choose a layout for the speaker details, select the image shape, and use the slider to set the headshot image size.
- Under Speaker List, in the Photo column, click Upload Photo.
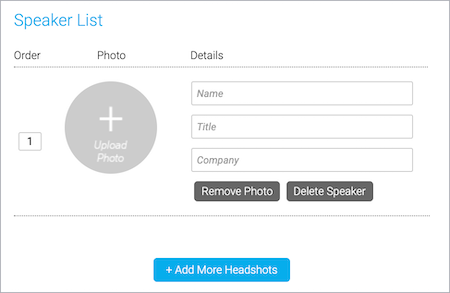
- Click Choose File, select the image, and then click Upload.
- If your image is a rectangle, point to the image and drag to center it within the guides, and then click Apply to crop the image.
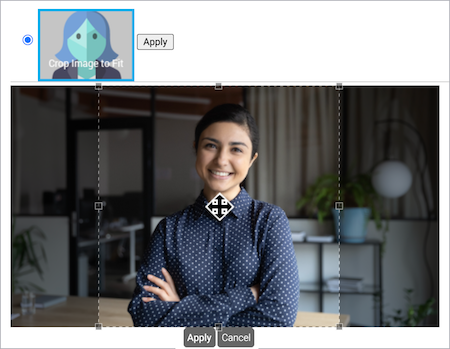
- Optional. Rotate or add text to the image.
- Click Save.
- In the Details column, enter the name of the presenter, their title, and company name.
- To add details for another presenter, click + Add More Headshots and repeat steps 3 to 8.
- When finished, close the Add Speaker Details window.
Add links
To add links:
- On the toolbar, click the Insert Link button. To turn text into a link, type the text and select it, and then click the Insert Link button.

- Enter the URL and link text.
If you highlighted the link text, it is already entered in the Text field.
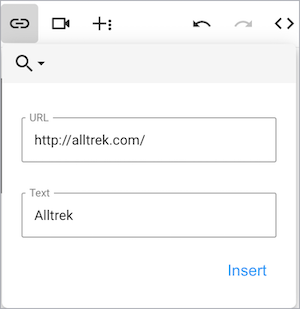
- Click Insert .
Embed videos
You can embed a video from YouTube, Vimeo, and Brightcove using its shareable URL.
To embed videos:
- On the toolbar, click the Insert Video button.

- Enter the video URL. If the Autoplay option is available, you can select it to play the video when an attendee lands on the page.
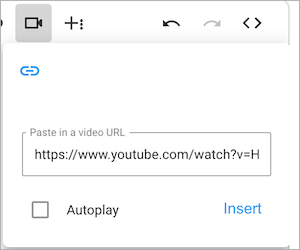
- Click Insert.
- Optional. By default, the video size is 640x360. To change the size of the video, click </> to switch to code view and change the height and width of the iFrame.
Add a Twitter feed
You can add a real-time feed of a Twitter timeline to the event window in a custom player tab.
To add a Twitter feed:
- On the toolbar, click the Twitter button.

- In the Embed a Twitter Widget window, select User Timeline and enter the @username of the feed you want to embed.
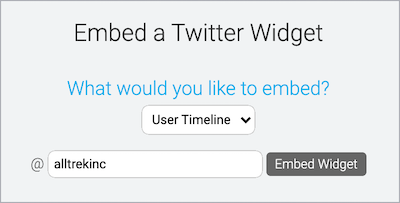
- Click Embed Widget.
- Optional. By default, the feed size is set to 100%. To change the size of the feed, click </> to switch to code view and change the height and width of the iFrame.