Video Bridge Guide for Presenters and Guest Admins
A Video Bridge allows presenters to connect to an event and broadcast from different camera sources and locations. As a presenter, you will join the event from your computer and connect the video source that you'll use to speak to the audience. Often this is a webcam, but you can also broadcast and present from a video conferencing system, Skype for Business, or a telephone (where you're not on camera).
Use this guide to learn how to test your system and connect to the Video Bridge. This guide contains the following topics:
- System Requirements
- Test your System
- Connect to the Video Bridge
- Connect using Another Source
- Navigate the Video Bridge
- Event Start Process
System Requirements
All presenters and venues must meet the following minimum system requirements:
- Operating system - Windows 11, Windows 10, Windows 8.1+ Pro, macOS 10.14+
- Processor - Intel Core i5 3.0GHz or equivalent
- RAM - 4GB
- Internet connection - A dedicated and hardwired high-speed connection of 1.5 Mbps+ (upload and download). We do not recommend using a Wi-Fi connection since it is prone to dips in bandwidth that can negatively impact your video connection.
- Internet Browser - Chrome (latest version), Firefox (latest version), Microsoft Edge (latest version)
- Webcam - High quality or HD webcast (for example, Logitech C920)
- Microphone - Headset microphone or webcam mic with built-in noise-cancelling
Note: If you are using a microphone, use headphones or earbuds to prevent feedback from your computer speakers.
Before the event, presenters and venues must also:
- Plug in their computers. Do not run an event on battery power.
- Disconnect from the VPN.
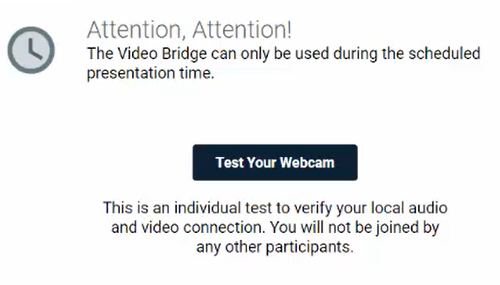
Test your System Before the Event Starts
It's important that you make sure your system is compatible before the event begins to identify and resolve any issues. At least 48 hours before the event, join the Live Studio and run a diagnostic on your system with the network and equipment you plan to use on the day of the event. This checks the quality of your audio and video connections.
You should have received an email with login details and a link to the Guest Admin or Guest Presenter Access site. The Guest Admin site includes a button that lets you enter the Live Studio.
To test your webcam and microphone:
- Sign in to the Guest Admin site and click Live Presenter Studio.
- In the Live Studio, click Test your webcam.
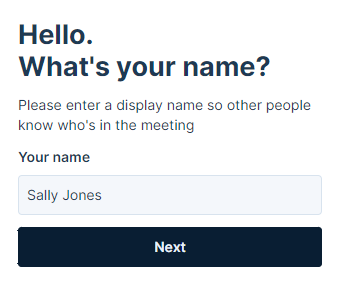
- Enter your name and click Next.

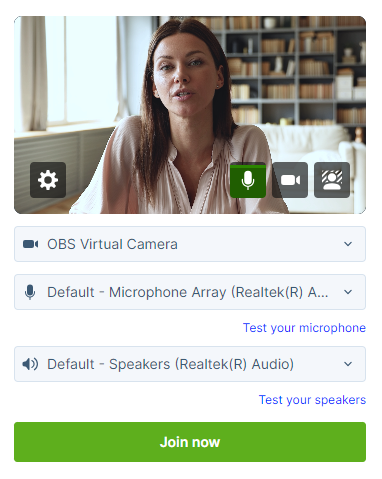
- Select the Microphone, Camera, and Audio Output sources you will use during the event. Confirm that the microphone volume level and webcam preview work properly. Click Test your speakers to make sure you can hear the event audio during the event.

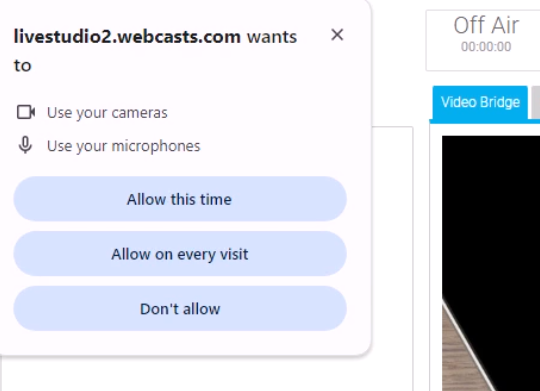
Note: If this is your first time connecting to the platform, you may be prompted to allow access to your camera and microphone before you can select your camera and microphone source. Click Request permission in the center of your screen if prompted.
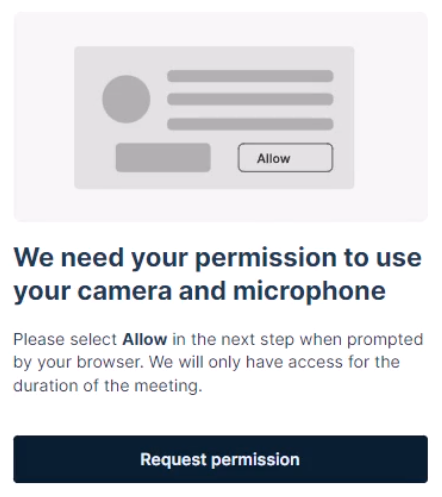
A pop-up in the top left will allow you to select what if you would like to allow access this time only or allow access for every visit.

- Click Join now and follow the guided connection test instructions.
The test records a short clip of your audio and video and plays it back to you. Make sure the video plays clearly, without feedback or echo. If it does not record correctly, there could be a network connection issue. Check that you have a wired (LAN) connection to the internet and that it is active.
If you have any issues, run the test again. If you continue to have issues, contact support or your event host.


Connect to the Video Bridge
To join the Video Bridge:
- Sign in to the Guest Admin site and click Live Presenter Studio.
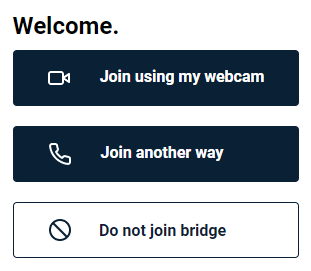
- Click Join using my webcam.
- Enter your name and click Next.
- Select the Microphone, Camera, and Audio Output sources you want to use for the broadcast using the available dropdowns. Confirm that webcam preview work properly and that your microphone audio is being registered on the microphone icon in the webcam preview window. Click Test your speakers to make sure you can hear the event audio during the event.

If you are a technical assistant or moderator who will not speak or appear on camera, use the microphone icon or camera icon in the lower right of the video preview to mute your microphone or turn off your webcam.
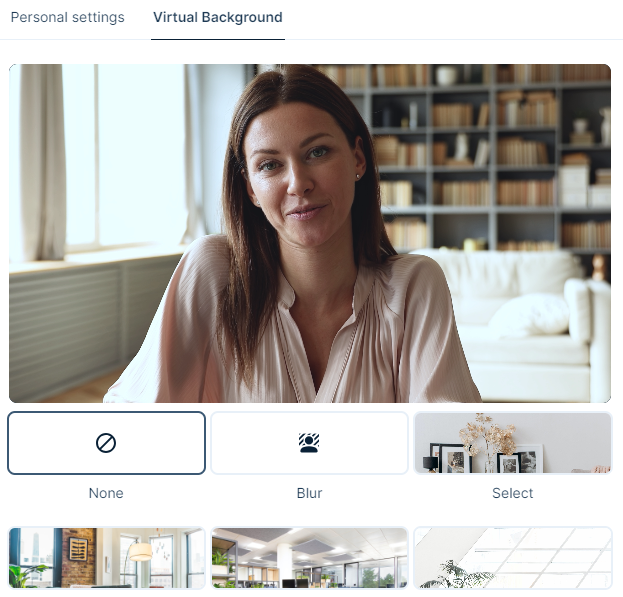
- In the lower right of the video preview, click on the person icon to add a blurred or virtual background to your video stream.
-
Click Join now.
Note: The Video Bridge utilizes UDP/TCP RTP Media Traffic over ports 4000-5000 to connect a webcam. If a presenter’s connection to the Video Bridge is blocked by their network, the system will automatically failover to use TCP 443 (HTTPS).
This failover is intended for presenters behind on a restricted network to ensure a connection can be made. However, TCP media is often subject to a noticeable delay and synchronization issues between audio and motion, as well as a delay on content share streams. It's always better to use a UDP/RTP connection whenever possible. For that reason, it is recommended that presenters disconnect from VPN before presenting. It is also recommended to test your system in advance to ensure there aren’t any issues connecting on the live event.


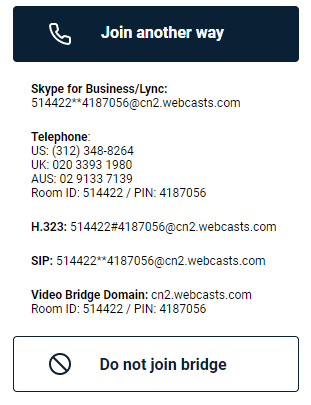
Connect to the Video Bridge using Another Source
If you are not able to connect to the Video Bridge, are experiencing issues with your audio/video stream on the Video Bridge due to a connection or network issue, or prefer to join from another source, the Video Bridge has additional connection options.
To join the Video Bridge:
- Sign in to the Guest Admin site and click Live Presenter Studio.
- Click Join another way.

- You will options to connect via Telephone, Skype for Business/Lync, or Video Conferencing Unit using H.323, SIP or a video Bridge Domain. Follow the instructions listed below to connect.
Navigate the Video Bridge
Live Studio Layout
Once connected to the Video Bridge, presenters will be able to see and communicate with other presenters on the Video Bridge. In addition to the Video Bridge, you may see tabs along the top of the Live Studio that provide access to Slides, Overlay Videos, Surveys and other content on your event. Please confirm with the Event Host your responsibilities during the presentation.
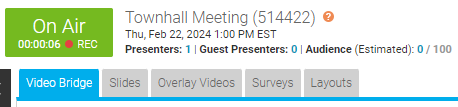
Once the event begins, you'll see "On Air" at the top of the window to confirm you are live to viewers. You can now speak, advance slides and use other controls for the event.
Video Bridge Controls
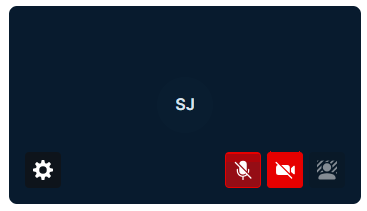
At the lower right of the Video Bridge window, each presenter has buttons to control their connection:
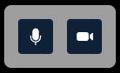
- Click on the microphone button to mute your audio.
- Click on the camera icon to hide your camera from displaying to viewers. These local controls can be toggled on/off during the event as needed.
Along the left side of the Video Bridge window, use the menu to access additional controls:
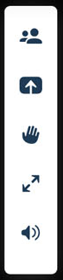
- Click on the people to access the Presenter List.
- Click on the up arrow icon to share your screen. Additionally details on screen sharing are included below.
- Click on the hand icon to raise your hand if you'd like to notify the event moderator or other speakers of your desire to talk.
- Click on the double arrow icon to launch the Video Bridge in full-screen view. Press Esc on your keyboard to exit full-screen view.
- Click on the speaker icon to mute the audio from Video Bridge.
Click on the gear icon in the top right to access advanced settings:
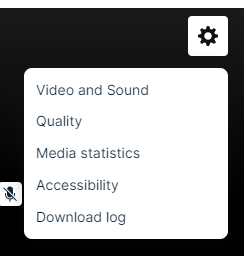
- Select Video and Sound to access controls to select or change your camera, microphone and audio playback sources. Enable "Voice Focused Noise Suppression" to suppress background noise on your connection. Enable "Prioritize Sharing Video" to prioritize motion over sharpness when sharing content with other participants. This is the best option when sharing video through screenshare as the motion will be smoother. When sharing static presentations or images, leave the option disabled to prioritize sharpness. Click Save to apply any changes to these settings.
- Select Quality to adjust your connection quality. This setting impacts the amount of bandwidth required by the presenter. It is set to Auto by default, so the quality will automatically adjust based on a presenter's connection, but it can be manually adjusted using the dropdown here.
- Select Media Statistics to see statistics on your connection. This will allow you to see the overall connection quality, along with details like packet transmission, packet loss and jitter. It is helpful to review these statistics if a presenter is having issues with their connection.
- Select Accessibility to always display Video Bridge controls. By default, controls will fade away after a few seconds of inactivity, but this setting will keep the controls displayed at all times.
- Select Download Log to download a log with details on your connection to the Video Bridge. If a presenter encounters issues with their Video Bridge connection, it's recommended to download the log here before exiting the Live Studio. The Video Bridge log will be helpful to investigate any issues encountered.
Bridge Indicators
Small indicators display at the top center of the Video Bridge view in Live Studio to show important details about your presenters. These indicators are not broadcast to your audience.
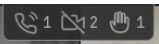
- Presenter count: Total number of presenters when there are more than can be shown in the current layout
- Phone participants: Number of presenters connected by phone
- Muted cameras: Number of presenters with video off
- Raised hands: Number of presenters with a raised hand
Screensharing
When sharing your screen, a pop-up window will appear allowing you to select what content you want to share. Select one of the tabs along the top: a Chrome Tab, Window (or application), or your Entire Screen.

Under the selected tab, choose one of the available options and click Share to make your screen share active to viewers.

Note: When sharing your Entire Screen or a Chrome Tab, use the "Also share system audio" toggle share your computer's audio along with your screen.
Once active, viewers will see the selected screen share application, a small window in the top right with the camera for the presenter sharing their screen, and a shared audio feed from the video bridge. Presenters should minimize their Live Studio and begin their screen share. Once complete, click Stop Sharing to end the screen share.

Event Start Process
To ensure a seamless start to your event, we recommend following the steps below:
- During pre-live procedures, streams are connected and previewed well before the event is set to start.
- Once an event is connected by the host and is in Stand By mode, recording will begin.
- The yellow Stand By indicator at the top of the Live Studio says REC and, upon hovering, shows the following message: "The server is connected and recording but any Audio or Video captured in 'Stand By' mode will NOT be broadcast to your audience or be made available in the automated event archive."

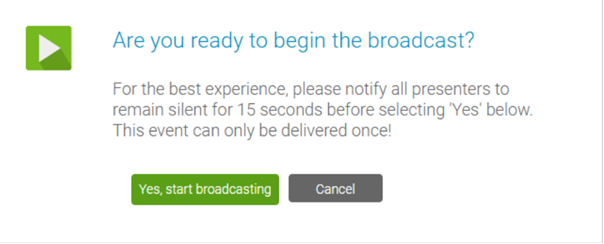
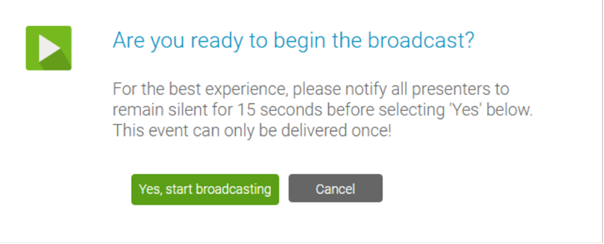
- The event host should instruct presenters to each silently count down from 15. At 0, the host will click Start Webcast (and then click Yes, start broadcasting in the confirmation message) to begin the presentation.
- Presenters can begin speaking once they see the On Air indicator at the top of the Live Studio turn green.