Screen Sharing on the Video Bridge
Screen Sharing Setup
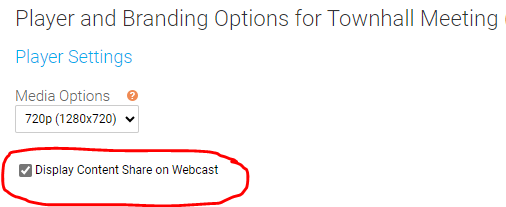
The ability to share your screen sharing with viewers is controlled using the Display Content Share on Webcast checkbox on the Player and Branding Options page of the setup. Screen sharing is automatically enabled on all Video Bridge events. Depending on the requirements for your event, screen sharing can be disabled in the event setup using this checkbox. 
Notes:
- This setting can be enabled/disabled once the event has started for individual presenters or for the event entirely.
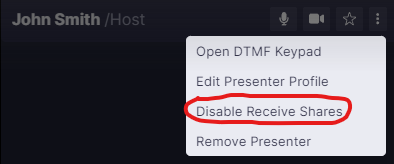
If you want to change this setting for a presenter, click on the settings button next to a presenter's name and select the Disable Receive Shares option. This setting can be re-enabled at any time by returning to this menu.
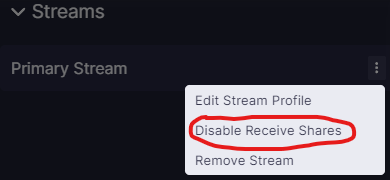
If you want to change this setting for the all presenters, click on the settings button next to the Primary Stream (or Backup Stream) and select the Disable Receive Shares option. This setting can be re-enabled at any time by returning to this menu. The stream needs to be connected in the Broadcast Controls window before this option is available.

When enabled/disabled for an individual presenter or the entire event, a private notification will appear at the top of the Video Bridge preview to confirm:
- Screen sharing will only be disabled by default if the event is created using a template that does not have screen sharing enabled. Copied events will have screen sharing enabled by default regardless of if the original event included screen sharing.
Video Bridge Controls
In the controls along the left side of the Video Bridge window, each presenter has the option to share their screen. Click on the screen share icon to share your screen with viewers at any time during the event.
Note: If you do not see the option to share your screen, please make sure you are using a supported browser and the hardware acceleration setting is enabled. To confirm if hardware acceleration is enabled, follow the instructions below:
Chrome Browsers:
- Launch Chrome, then select “Menu” > “Settings“.
- Scroll down to the bottom and select the “Advanced” option.
- Scroll to the “System” section and toggle “Use hardware acceleration when available” on or off as desired.
- You should now be able to join your event once Google Chrome restarts.
Edge Browsers:
- Click on the Settings and more (Alt+F) 3 dots menu icon, and click/tap on Settings.
- Click on System on the left side.
- Turn on Use hardware acceleration when available for what you want on the right side.
- Click on the Restart button to apply.
Contact Support for additional help.
How to Screen Share
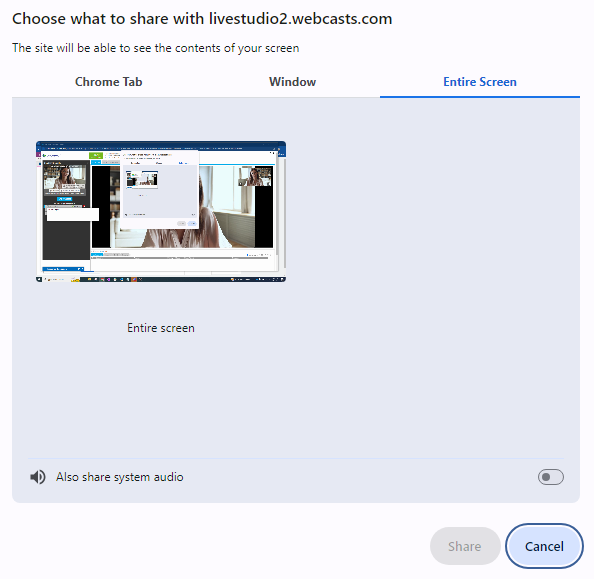
When sharing your screen, a pop-up window will appear allowing you to select what content you want to share. Select one of the tabs along the top: a Chrome Tab, Window (or application), or your Entire Screen.
Under the selected tab, choose one of the available options and click Share to make your screen share active to viewers.
Notes:
- This setting can be enabled/disabled once the event has started.
If you want to change this setting during the event, click on the settings button next to the Primary Stream (or Backup Stream) and select the Disable Receive Shares option. This setting can be re-enabled at any time by returning to this menu. The stream needs to be connected in the Broadcast Controls window before this option is available.

When enabled/disabled, a private notification will appear at the top of the Video Bridge preview to confirm:
- Screen sharing will only be disabled by default if the event is created using a template that does not have screen sharing enabled. Copied events will have screen sharing enabled by default regardless of if the original event included screen sharing.
Video Bridge Controls
In the controls along the left side of the Video Bridge window, each presenter has the option to share their screen. Click on the screen share icon to share your screen with viewers at any time during the event.
Note: If you do not see the option to share your screen, please make sure you are using a supported browser and the hardware acceleration setting is enabled. To confirm if hardware acceleration is enabled, follow the instructions below:
Chrome Browsers:
- Launch Chrome, then select “Menu” > “Settings“.
- Scroll down to the bottom and select the “Advanced” option.
- Scroll to the “System” section and toggle “Use hardware acceleration when available” on or off as desired.
- You should now be able to join your event once Google Chrome restarts.
Edge Browsers:
- Click on the Settings and more (Alt+F) 3 dots menu icon, and click/tap on Settings.
- Click on System on the left side.
- Turn on Use hardware acceleration when available for what you want on the right side.
- Click on the Restart button to apply.
Contact Support for additional help.
How to Screen Share
When sharing your screen, a pop-up window will appear allowing you to select what content you want to share. Select one of the tabs along the top: a Chrome Tab, Window (or application), or your Entire Screen.
Under the selected tab, choose one of the available options and click Share to make your screen share active to viewers.
Notes:
- When sharing your Entire Screen or a Chrome Tab, use the "Also share system audio" toggle share your computer's audio along with your screen.
Once active, viewers will see the selected screen share application, a small window in the top right with the camera for the presenter sharing their screen, and a shared audio feed from the video bridge. Presenters should minimize their Live Studio and begin their screen share. Once complete, click Stop Sharing to end the screen share.
- When screen sharing, a picture-in-picture window of the presenter's video normally appears in the upper right corner. If voice-activated switching is disabled, the PIP video isn't shown, it's only the content share.


